Tue 5 Oct 2010
Sometimes projects just take on a life of their own. Even projects that you never intended to have.
Early this summer, someone in the spinning group was giving out indigo plants. I was tempted, but I was good and resisted the urge to take on a load of free dye material. After all, I didn’t have the garden space, the equipment for natural dyeing (which takes quite a few more chemicals and supplies than acid dyes), or really the time to get into a long and involved dyeing process. I was very good, and I walked away.
Last Monday, someone who had taken on some of the plants came to spinning group, and told us how she really, really wanted to dye with them but things were crazy and she was busy and is getting ready to leave for a two week trip to Italy. She couldn’t use the plants, and would someone please come get them so that they don’t go to waste?
This is October. In Wisconsin. Indigo is frost sensitive. (Insert time crunch here.)
I was busy this past weekend because Branden was home, and so we decided that we would cross our fingers that the frost would hold off and then maybe I’d make it down there to pick the plants this coming weekend so that they wouldn’t go to waste.
Last Thursday night, she called again. They were due for a hard frost on Friday.
I talked to Branden, and we did some last-minute shuffling of plans so that we could end up kinda sorta close to her house to pick some indigo. (My husband is terribly intolerant of my fibery pursuits, isn’t he? He even helped pick….)
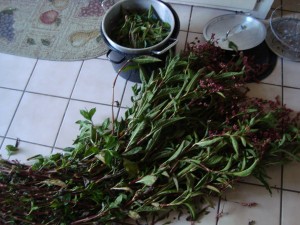
By the time we got home, Branden was ready for a nap anyway, since he’d gotten up at something like 4 am. While he was sleeping, I collected all the leaves:
I froze a few ounces, dried a bunch of stems by hanging them upside down, and then put the rest in my dye pot for stewing. I figured it was best to hedge my bets.
I should say at this point that I have not yet found a single recipe that takes me every step of the way through this rather complicated process. There are hundreds of recipes out there, and they either start from a commercial powder (probably the sensible thing to do), or they use the fresh leaves immediately for dyeing. The latter method says that the leaves have to be used within 20 minutes of being picked, and it took more than 40 just for us to get home. I wasn’t willing to spend the entire day dyeing, so I made a very predictable move and decided to just wing it. Recipe? Who needs one? It’s only a fermentation vat, right??
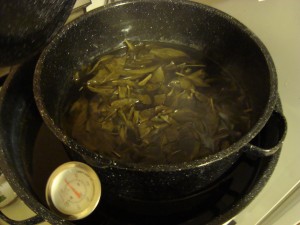
I started out by stewing the leaves at 160 degrees for about 2 hours. There was one heart attack moment when the lower pan in the double boiler made it to boiling temperatures because my thermometer was misreading, but thankfully we caught it in time and managed to avoid overheating the plants.
By the end of the heating, I had a very dark tea-like liquid with a scummy layer on top, which I take to be a very good sign. (Indigo should have a layer of insoluble dye at the surface of the water, because it is easily oxidized into an insoluble form by the air. Or so I’ve heard.)
This is the part where it became off the cuff. I got some washing soda, because that’s what a lot of people use to make the dye solution basic, and because it sounded a heck of a lot better than liquid ammonia or fermented urine. Turns out you can buy washing soda in the pool supply section of the hardware store. Who knew?
I didn’t really measure how much base I put in, and I didn’t really measure the pH. I should have, but I didn’t want to waste time digging around for pH strips. In all, I probably added about a cup and a half. The amount that I need would vary depending on the amount of water and the amount of dyestuff, and I don’t really have good numbers for either. I started out with about 6 oz of leaves, but there’s no telling how much dye is actually in them. So, I added what felt right.
The next bit is the part I’m not really sure about. Indigo has to be reduced back into its soluble form, and the way to do that is to remove all oxygen from the water. This is usually done using microbes (see fermented urine, above). I wasn’t ready to count on bacteria having survived my heat bath, so I followed one recipe that suggested using yeast and a little wheat bran. I didn’t have wheat bran, so I used rice flour. It’s just there to help keep the yeasties happy, so presumably anything starch based will do. I didn’t know that yeast could survive at such low pH, but apparently it can. Or so the internet claims.
Now, we are in the sit back and wait stage. In theory, I should have this dyepot at a constant body-like temperature. There is nowhere in my house that is that temperature, so it’s sitting in the basement near the dehumidifier vent, which is probably the most consistently-warm place in the house. I checked on it tonight, and there’s really not much to see, which is probably a good thing since I went all the way down there with the camera and then realized that I forgot the camera card in my computer. Imagine a rather brownish liquid that looks kind of like oversteeped tea filling a cat litter pail and covered precariously with saran wrap. Not very exciting, in truth. I detected no signs of happy fermentation, but then it’s kind of hard to tell in such a thin liquid anyway, and it may take a few days to get going since the temperature is cooler than optimal.
So, I may or may not be making an indigo vat. I’m not really sure. The one thing I am sure of is that I haven’t followed any of the directions exactly, which is the only thing that all of the recipes seem to agree that one must do in order to succeed in dyeing with indigo. After screening several dozen conflicting recipes, I decided that it really seemed silly to me that there should be so many conditions that absolutely must be met in order to make a decent dye. People wouldn’t have been doing this for thousands of years if it were rocket science, right?
In the end, there is a plant with dye. You steep the leaves to get the dye out. Then you have to reduce the dye in a basic environment (using bacteria, happy yeast, or some other reducing agent). Once it’s reduced, you dip in the fiber and see what happens. In an ideal world, the dye will have adhered to the fiber in its reduced form, and will then oxidize back to blue when it hits the air. So far, I haven’t seen any blue, but I also don’t think that my dye vat is ready. They’re supposed to take a while to ferment. Maybe I’ll add some more yeast.
I also need to check what kind of pH wool can take. The recipes say that they’re for wool, but so far as I know, protein fibers and base do not mix, so I’m a bit unsure as to what will happen when I dip skeins of wool into a base bath that’s supposed to be between pH 9 and 11.
It will probably be a minor miracle if this dye bath produces anything other than a faintly sweet rotting odor at the end of its one to two week incubation stage. But then again, it could make a beautiful blue. At least the frost didn’t get the plants, right?

