Thu 24 May 2012
Writing blog posts is a great decision maker for me. I start out a post with no idea of where I’m heading, and usually by the time I’m done some part of my brain has a pretty clear idea of what needs to be done. Sometimes it takes the rest of me a while to cotton on to the fact that a verdict has been reached, but it’s almost always there, somewhere, just waiting for me to stop and pay attention.
In the last post, I think it was the moment I wrote the words “kill your darlings.” I didn’t realize it at the time, but by the next morning I was pretty sure of what I had to do. The shaping wasn’t working: the shaping had to go.
The most beautiful forms in nature come out of utility. A snail doesn’t make its shell to be beautiful and perfectly designed; it makes its shell to keep it from being eaten.
Of course human design is a little more esoteric, and there are plenty of things out there that are made simply to achieve a certain (sometimes questionable) aesthetic, but at some point in practical knitting the design becomes less about some platonic ideal and more about making a garment that does what it’s supposed to do. Or, in this case, making a pattern that is easy to write and easy to follow.
Form follows function. Get the function right, then develop the form to match. Got it. Decision made. Easy, huh?
That left the challenge of exactly how to redesign the sweater waist shaping to be easier to incorporate into a pattern of multiple sizes.
The problem was really that the waist shaping and the neck shaping are both locked into the allover lace pattern repeats. If I want to increase by half a repeat, it will throw off one or the other because I need to keep the lengths the same.
But what if the waist shaping weren’t locked into the lace repeat in the same way? (This is option #4 in the last post.)
In that case, I wouldn’t have to move the waist shaping up or down by half a repeat when I change the size, and the neck shaping would stay in the same place. If I put the decreases into the lace pattern itself instead of leaving out a part of a repeat at the side, then I could put them anywhere I want within the garment, and the number of decreases would be proportional to the number of repeats in the piece (2 fewer stitches per repeat means more decreases when there are more repeats, and fewer when there are not as many repeats).
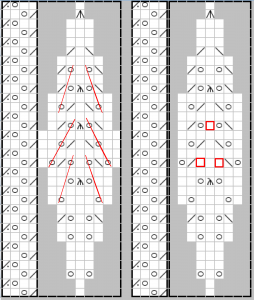
Fortunately, that’s very easy with this lace. There are three main lines of yo’s in the body of a lace repeat, and they are paired with decreases to achieve a gradual change in the pattern width. I wanted to keep those yo lines the same, but eliminate 1 stitch on each side from the widest part of the lace pattern. In the size that I’m knitting, that will eliminate 6 stitches from the front panel, which is about an inch of width in the final piece.
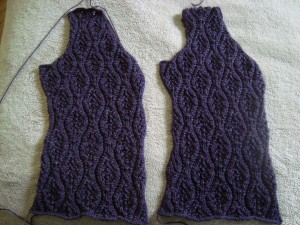
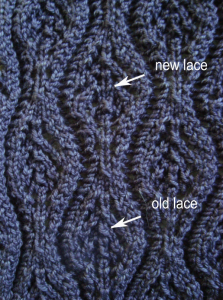
By leaving out two yo increases and then one “extra” decrease (the red boxes in the chart), I altered the lace to be the same height, but 2 sts narrower. I did lose one pair of yo’s in the main pattern lines, but it’s really not very noticeable in the final fabric. Here are the two versions side by side:
The one on the left has the original waist shaping, where I left out part of a pattern repeat at the underarm seam.
The one on the left is the new shaping, with the same number of repeats all the way through the garment, but with the narrower waist shaping chart knit in for one pattern repeat.
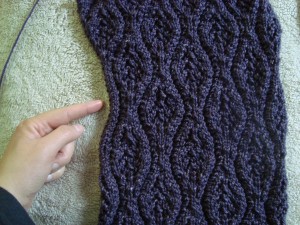
If you look veery closely, you might be able to see it here:
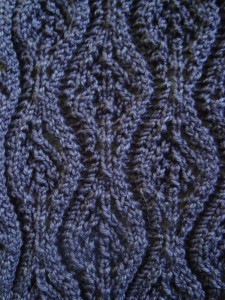
Or maybe not. How about now? (The arrows are pointing to the centered double decrease left out of the second chart.)
By replacing just one section of the lace with the new, narrower chart, I got almost exactly the same amount of waist shaping, and a much easier pattern to write.
It’s almost always worth it to let design support function, rather than the other way around.
Now if only I could remember that next time I’m captivated by a particular idea…

