Mon 23 Nov 2009
Flight date is fast approaching, and this has been a week of lasts. Last knitting meeting, last dinner with friends, last time grocery shopping in Germany, last this and last that. Closing up one life, preparing to move on to the next.
That might be part of the reason that I’m enjoying working out transitions in lace, finding one design that flows seamlessly and beautifully into the next.
In the waving lace shawl, I created the knitting and then began to chart and plan the pattern. I reknit the piece to make sure that the new plans would work. I have charted and swatched and charted again, tweaking and reinventing each time. It’s almost done, but there is still some swatching left to do. When I began, I didn’t know what I would need for the pattern. Working through the process has helped me to see what I will need at each stage, and how to set up a project so that it leads into a pattern with a little less reworking along the way. It’s slow going, but I have learned a lot.
The transitions are the most important part, and they’re the part that I knit most intuitively. I don’t usually plan them; I knit until I get there, and then see what makes sense with the stitches as they sit on my needles. Sometimes I take notes, but they’re not usually very thorough; more like a secret, cryptic code for myself than a set of clear instructions for someone else to follow.
This time, I am working on making those instructions more explicit the first time, in the swatching stage. This time, the first knit piece will be the test piece. This means that there’s a lot more up-front planning involved.
I started out with the wave pattern that I showed you last time:
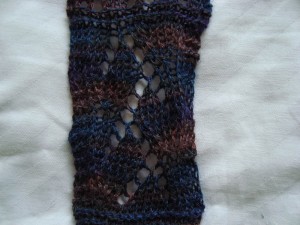
This pattern comes from the Walker books as an allover pattern, whose repeat begins at the center “stem” of the vine. But I want a single vine running down a knit panel.
I switched to a thicker yarn for this swatching, since I wanted better stitch definition than the dark laceweight could provide. No sense going blind trying to count stitches and remember where I put the decreases. I couldn’t find my normal swatching yarn, so I used the red scarf yarn. First, I recharted the lace with one repeat in the center. In the allover pattern, the yo’s bordering one vine feed into the next motif, creating its leaves. I replaced those extra yarnovers with make-one stitches, so that I would have just one vine on a solid background.
The vine pattern works by having yarnovers separated from decreases across the entire fabric, which causes the lace to widen and narrow as it’s knit. In an allover fabric, this doesn’t make much difference, as the width of one repeat compensates for the narrowness of another. In a single-repeat panel, though, it makes for wavy edges.
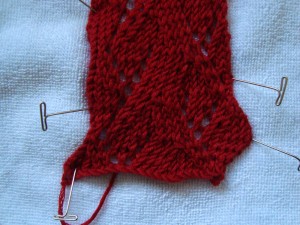
The first repeat (at the bottom) is knit in the pattern as given: the right-hand side bulges out, and the left-hand side dents in. After working that one repeat, I began eliminating make-one stitches and the corresponding decrease stitches so that the edges would stay straight.
This gave me the single vine that I wanted, but it also caused the whole pattern to shift over one stitch with every repeat, which wasn’t exactly the effect I’d hoped for. I wanted a panel that went straight, not one that moved over one stitch every twelve rows. I fussed, I recharted, I fussed again. I counted stitches, I compared with the original pattern. It still translated over one stitch.
Eventually, I gave up on my charted version and decided to start again from scratch. I studied the way the increases and decreases worked together, and figured that I knew enough to just rewrite the whole thing. One thing I noticed was that there was a set of staggered decreases on each side of the vine, and that they were separated by four stitches running down the middle of the panel. I wanted a narrower piece anyway, and I couldn’t see what they could possibly be good for, so I simply eliminated them.
As often happens, too much planning and analysis took the spontaneous, organic curves out of the design.
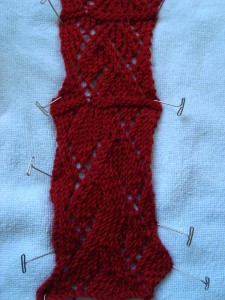
The part knit above the garter stitch separator is very similar to the first, and much narrower (just as I’d wanted), but it’s missing the undulating curves that made this pattern interesting to begin with. The curves are a product of those four seemingly useless stitches that do nothing except run up the center of the piece, leaning left and right as the fabric around them increases and decreases. They’re also a product of decreases worked on a different spacing than the increases. This didn’t make sense to me, so I’d put the increases and decreases parallel to one another, and I’d lost the flow. Maybe I didn’t understand this stitch pattern as well as I thought I did.
I went back to the beginning, and started over. I began with the original pattern, changed to solid increases, eliminated the wavy edges, following the same set of steps as before. This time, I paid more attention to the waves, and figured out that I’d added an extra yarnover while trying to force the pattern to follow lines too rigidly.
Now that the vines were cooperating, it was time to start working on the blocks. I’d found my swatching yarn and so I turned back to wool, which is a lot easier to work with. Again, I charted. Again, I got it wrong the first time (but only partially). I went back to the swatch and felt my way through it, ending up with this:
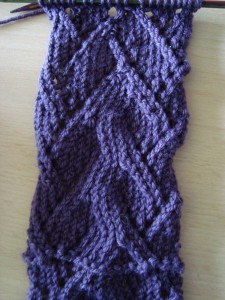
At the bottom, curvy vines. At the top, angular blocks. (Sorry for the horrible lighting…it’s definitely November around here, and it’s hard to get a good picture, even at noontime…)
And so it goes. Chart, swatch, chart. Analyze, overshoot, correct, try again. Correct the corrections, create the final chart.
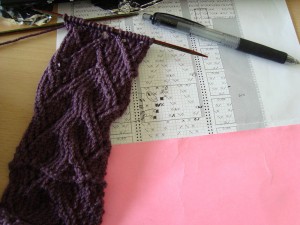
But it’s coming together, and I really do love that transition.
4 Responses to “ Transitions ”
Trackbacks & Pingbacks:
-
[…] then, all of a sudden, there was a tickle at the back of my brain. The shawl was calling. Not necessarily calling me to knit, but calling to say I’d picked the wrong […]
I agree that the last one is more interesting with more movement. Can’t wait to see where it goes.
I love the parallel with life’s transitions. And isn’t it true that the notes we make for ourselves about how to get through those times of change aren’t comprehensible to anyone else? Good luck getting through all of the transitions in lace and life — it looks to me like things are pretty under control!
I like the direction you’re moving with the series of swatches–the last one really seems the most dynamic. Good luck with the continued swatching!