Entries tagged with “process”.
Did you find what you wanted?
Thu 9 Aug 2012
So I’ve been thinking about what exactly I want to do with the theoretical knitting idea (besides come up with something to talk about that does not involve how many stockinette stitches I have knit this week!). Mostly, I think I just want a place to capture ideas outside of my design notebook, and to make for more interesting writing that will keep me coming back to chat on the blog, even amidst all the craziness of fall.
Also, I find it really helpful to have a reason to think up new ideas. Design is one of those things that works best when the pump is primed, and if you wait too long in between it gets harder and harder to come up with things. Â Ideas breed ideas, and before you know it you’re drowning in them. It’s a cruel cycle, really: you’re only coming up with thousands of designs when you already have too many projects and not enough time to do them. If you’re able to capture those ideas when they’re flowing, then they also manage to carry you through the dry spells when your creative powers are needed elsewhere. It’s no coincidence that I’m still knitting projects that I dreamed up in Germany, back in 2009. A tiny hint of a knitting idea can go a long way.
I spend some time curating photos for color inspiration in the same way; when I see something I love, I put it on Pinterest, and save it for a rainy day, or just a day when I have time to dye but no specific ache in my soul for a particular color. I am beginning to get quite a collection, and I can always find something to spark my interest, no matter what my mood. (This is my one and only use of Pinterest, lest I fall into yet another rabbit hole.)
A week or so ago, I was on a color-gathering spree, and came across this photo of an octopus:

I have looked around for proper attribution, but the best I can come up with is a tumblr link. I’d love to know where it came from, because I bet that photographer has a million other things I’d love to pin.
I was drawn to the picture first because of the colors, which are not altogether unlike these:
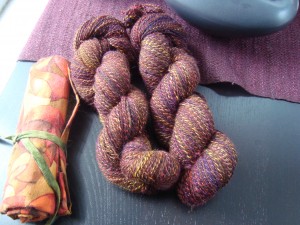
I am fascinated by the mix of orange and purple near the head, and those brilliant spots of white right at the hem.
That last bit got me thinking. The hem.
Wouldn’t his skirt make a beautiful shawl?

I’ve drawn inspiration from sea creatures before; they are masters of using simple design to create flowing, graceful structure. Nature has an excellent eye for proportion.
Now the question becomes how you would achieve such a thing in knitting. Those strong rib lines made by the octopus legs would work beautifully to space out the rapid increase and decrease sections needed to get the curved shaping. (On a related note, there’s an excellent discussion of how to make or avoid scallops in a knitted hem on the Rainey Sisters’ blog, where I have been lurking lately.)
But then, I think I’d want to knit the body of the shawl in stockinette, and knitting enough stitches in those long final rows to make that many scallops might just kill me. So what about short rows? That would let you keep that stunning contrast row right at the end, and would allow it to continue up into the body of the shawl the way those white dots follow the edge of each scallop right up into the body of the skirt. It would also break up the stitches into much shorter, more manageable rows.
Then I stopped and really looked at my sketch. Each one of those scallops is really just a half circle, stacked on top of the last:

What if you started at one end, knit a small semi-circular shawl, worked the contrast edging, and then picked up stitches and continued on with the next?

You’d work your way around the shawl, adding scallops as you went. No super long rows, and very simple knitting. You could do so many different things with the colors, too. Imagine this knit in a gradient yarn, or with two highly contrasting stripes to emphasize all those graceful curves.
Of course, this is the part where the practical side of me steps in and demands to know whether I would ever wear such a thing. This is one of those garments that falls into the questionable category for me, though I am rather smitten with the design. It’s a lot like the striped shawl sweater: a little bit of a stretch in the attention-grabbing department. (For the record, I love my finished striped shawl sweater, and wear it all the time.)
On the one hand, the shawl could be a beautiful, eye catching design. On the other hand, you might end up walking around looking like an octopus with a slightly shrunken head. You know – the usual fashion risk.
For now, the practicality likely doesn’t matter, given that this is theoretical knitting after all. Still, I think this is an idea that might be worth coming back to. It smacks of promise, and I do really like those curves.
Sun 15 Apr 2012
The final countdown is on…we leave for the show on Thursday. I have quite a pile of fiber (about 150 braids) waiting patiently in boxes, a basket full of sample skeins and sweaters spun from hand dyed and spun yarn, and today I have one more sweater to add to the pile:

The striped shawl sweater (which really needs a better name) is done. I finally finished the zipper this afternoon, and now it just needs its second and final blocking.
I am mostly happy with how it came out. I like the design itself even more than I thought I would, but it came out a little bit too tight around the waist and hips because of a couple of extra decreases that would have been better left out. I tried it on after blocking for the steek and it seemed to fit just fine, but wearing it around the house today I can tell it’s still a little tight. Between that and the way this construction stretches, it tends to ride up just a touch. You can see that a little bit in the back.

There’s a tiny bit of a crease at the point of the triangle, and a bit of bunching under the arms. Both of those go away with a little bit of tugging, though, so I’m hoping that it will relax out with the second blocking. An extra inch would take care of both. Or, I could always just wear it open.

I very much like having the power of steeking in my toolbox. This is my second steeked sweater in a row now, and the first where I picked up stitches and knit a button band (the purple stripe around the zipper is picked up and knit). I’d show you close ups, but my camera ran out of battery and refused to take any more pictures, so that will have to wait for another day.
I wanted to try a crochet steek on this sweater, but found out that that method shouldn’t be used close to the end of a row. Since all of my color changes happened in that front band, I decided to stick with a machine-reinforced steek instead. I ended up using two rows of machine stitching, and then just folding it over and tacking it down. There’s a piece of grosgrain ribbon attached to the zipper inside to help protect the raw edge, and it looks very secure to me. I’m already working away on the next sweater design, and I suspect that it may also have a steek. I have quite a few pullover sweaters now, and am really looking forward to having these new cardigans in my wardrobe. (Bright lights has been getting a ton of use, now that the weather is starting to warm up a bit.)
I’m happy to have the striped shawl sweater finished in time, because I think it will make a fun sample for the show booth. It’s a good example of what you can do to mix different handpainted colors into a wearable garment. The sweater is one of the lightest I’ve made, weighing in at 1 lb, 1 oz. It took 5 braids of fiber because I needed just a little more purple to finish the body.
Linda and Walden have been knitting away at their test knits for the shawl version of this design. You should go take a peek; it’s really interesting to see how the different yarns and colors highlight the geometry of the increases. I can’t wait to see how the final versions come out!
I also finished spinning up a sample of the new Rambouillet for the booth.

I ended up with about 470 yards of 2-ply fingering weight. Somehow I am still having trouble breaking through that fingering-to-laceweight barrier. I’m not sure whether to blame it on the wheel or on myself, but my best attempts at a fine yarn have all been coming out in this range, even using the smallest whorl on the lace flyer. It’s just difficult to get enough twist into the yarn to keep it fine. Some sections of these skeins are in the heavy laceweight range, though, so I think there may be some hope of figuring out how to go finer yet.
This color isn’t one that I would usually gravitate toward on its own, but I am itching to use it. The words “leaves of grass” are all I can think when I look at those skeins, and I’m thinking it will turn into something lacy with a wheat-ear theme. Time will tell, though. The Rambouillet spins like a dream and puffs up into a beautifully fluffy yarn, and I have a feeling that it will bloom even more after it’s bath. It’s upstairs drying right now, so we’ll know soon!
Fri 6 Apr 2012
…makes Jack a dull boy, right?
Since most everyone seemed to be leaning toward play (and since I had some pretty strong leanings in that direction myself), I decided to try spinning the second half of the gradient as a short repeat yarn.
As instructed, I kept it simple. No overthinking…not even a bit. (Who me? Overthink? Never!)
I split the top along its full length, making 10 very narrow strips.

Then I spun them, one after the other until I ran out. (I was also careful to keep the cats out of the pile while I was spinning. This was critical, and proved to require more attention than I expected. Apparently lots of little strips of fiber = warm nest in the mind of a cat.)
I chain plied the singles like I did for the first skein, and ended up with about 2 yard lengths of each color (compared to about 20 yards per color in the previous skein). You can see the difference in the color distribution here:

And the two skeins together:

True to form, I like the long repeat version better in the skein, but I’m really not sure which I would prefer in the knitting.
I’d started out spinning this yarn expecting it to become a pair of socks, so I spun a (slightly heavy) sock weight. But then I was thinking about it, and I wasn’t sure that I wanted that long a gradient along the length of just one sock. That’s where the possibility generator kicked in and suggested that shorter repeats would be nice, so that there would just be a few rounds of each color in repeating stripes.
For a sock, I think I’d much prefer the shorter repeat version. I’d guess that there would be 3, maybe 4 rows per color, and then the colors will repeat every half inch or so, for the full length of the sock.
If I were to knit this into a shawl or a larger garment, then the long repeat version would look really good striped with a darker solid color. Of course, you could also alternate sections of long and short repeats to get all kinds of interesting combinations, too.
Because this is me, I no longer want to use this yarn for socks. My brain somehow manages to take a sharp left turn every time I sit down to think about knitting socks. Sweaters and shawls and bigger things are just much more exciting for some reason. (Also, I like my socks to match, which might be hard with this yarn now.)
Last night, I was having visions of a stranded colorwork bag, with the bright yarn worked on a dark blue background. But today, a mischievous little voice is suggesting that they would look very nice woven.
I said I didn’t overthink the spinning. I didn’t promise anything at all about the using of the yarn.
(Of course, all these ideas just mean more decisions, but that woven idea is pretty sticky. I think it might win.)
Sun 25 Mar 2012
The striped shawl sweater has been slowly creeping slowly forward with the same knit-rip-knit pace. I’m past the striped section and have been working short rows to transition into the main body color. I started out decreasing one stitch for every three rows that I knit, which looked pretty good at first, but looked less good as the fabric grew. I worked short rows for both of the sleeves and half of the body before deciding that it looked a little too puffy.

See how there’s a bump at the edge of the dark fabric? Well. It was bothering me. So I ripped it out, and reknit the short rows, decreasing one stitch for every 2 rows instead.

Isn’t that better?
I’ve since redone the short rows, and finished the main body section. I had to spin some more yarn to make it, but I am very happy with how it’s coming out.


I am to the elbows on the sleeves and I am running on yarn fumes, so I’ll need to spin up another hundred yards or so to finish it off. I hadn’t counted on the short row decreases to add so much shaping, and I added a few of my own, which turns out to have been unnecessary. The final fit ended up a tiny bit tighter than I’d like, but I think it will loosen up with blocking and I don’t think it’s enough of a problem to rip back again. This project may finally be in the home stretch. All that’s left is finishing the sleeves, and then steeking the front to install the zipper. It’s getting close!
While I’ve been knitting the striped shawl, I’ve been keeping my spinning wheel busy finishing up the green for the fall colors sweater.

It’s all finished now, and will be ready to go as soon as I settle on a design. I’d like to say that it will be simple to make up for the last, but somehow I think that’s unlikely. (I’m still leaning toward the last design in this post, which will involve both steeking and a little bit of tailoring, and I’m thinking it likely that it will also have some rather experimental colorwork going on. Never a dull moment around here.)
Amazingly, that brought me to the end of what had seemed like a very long spinning queue, and suddenly it was time to start spinning the wool for Mike’s sweater, months earlier than I had planned. He’s a close friend of ours, and I think this may officially be the first big thing I’ve knit for someone outside of the family (mostly I knit just for Branden and I). We usually stay at Mike’s house over Christmas, and he was especially taken with Branden’s MacGyver sweater this year. He kept asking how long it took to make a sweater, from spinning the wool through to wearing it. I didn’t know, but I’ve decided to find out by spinning up the rest of the Shetland that I bought from that farm. Since Mike is also of an engineering bent and loved the MacGyver angle, I’ll also work in some of the leftover MacGyver yarn, probably as colorwork or stripes around the shoulders. For now, I’m spinning some wool from Harriet:

Doesn’t she have a lovely fleece? I liked it well enough in the roving, but it wasn’t until I started spinning it that I realized how beautifully heathered the gray is going to be. I have to admit that I have been struggling to resist the temptation to claim this wool as mine (as it was originally intended to be), but I am going to stick to the current plan. There will always be more fleeces, and I am getting to have a lot of sweaters!
One thing that has been very interesting about this set of projects is spinning from three fleeces from the same farm. You’d think they’d be pretty similar, given that they are three sheep fed and coated the same way, living in the same flock. The wool was presumably sheared by the same shearer and processed by the same mill. But the fleeces are not the same. As a reminder, MacGyver’s is the light gray wool in the sweater, and Magnolia’s is the dark brown.

MacGyver’s wool was kind of downy, but had lots of heavier guard hairs in it. I tried picking them out as I went, but enough stayed in to make the sweater slightly prickly when worn on sensitive skin (fortunately, Branden doesn’t mind). As Branden has worn the sweater, the guard hairs have tended to poke out here and there, and we’ve been pulling them out over time. I’m not sure that it’s making much difference, but I like to think that the sweater is getting softer and softer with time. Either that, or we’re helping it to fall apart faster, but I’m sticking to the first interpretation. MacGyver’s was the first wool of the three that I spun, and it was full of little pills of short fiber, like the wool had been slightly tipped or there were second cuts in the shearing. I must admit that I was not looking forward to spinning three big bags of wool like that; pills in the spinning make me crazy. But the fiber was beautiful otherwise, and I loved the yarn, so I kept spinning.
Magnolia’s wool had none of the pills, and none of the guard hairs. It was a much thicker feeling fiber, very smooth and greasy, almost like alpaca. The pills must have been from MacGyver and not from the mill, since both Magnolia and Harriet’s fleeces are pill-free. Harriet’s fiber is different yet again. It is much lighter than Magnolia’s and very soft, Â more like the downy fleece in MacGyver’s wool. There aren’t many guard fibers at all, though there is a lot of hay. Harriet loved to wear her hay. I pull little bits out as I’m spinning, and I can’t help but imagine this sheep standing by her hay bale, munching away, pulling it down on top of her shoulders. Fortunately, most of it pops right out while I’m spinning, so it’s not a big deal, but it does amuse me to think of how this sheep must have always been wearing her food.
While I knit one sweater and spin toward the next, I’ve also been taking advantage of the beautiful weather to get outside and comb some more of my Gulf Coast fleece from last year. It is slow going, preparing a whole fleece by hand. I spun up most of what I had combed at Christmas to give to a friend, and I’ve only done a few ounces since then. It will be quite a while before I work my way through the whole 2.5 lbs, but it is very satisfying to see my bag fill up with these airy little puffs of fiber.

So there we have it. Handspun wool in all its stages. (Now all I need is a sheep.)
Sun 18 Mar 2012
When I realized that the striped shawl sweater was in fact going to be a sweater and not a shawl, it freed me up to finish the spiral shawl that has been languishing on the needles for ages. The idea for this pattern came from the spirals of a seashell, which made me wonder if adding successive layers of increases would lead to a spiral that eventually wrapped around.
For the pattern, I decided to go for a short shawlette version, something small and simple to highlight the shape and the increase lines.

One of the reasons I’d first put this shawl aside was that I just couldn’t find an edging that I liked. I looked and looked, but nothing was quite right. I wanted something with a little lace to it, but that preserved the simplicity of the shawl. I’ve found myself more and more drawn to simple, understated stockinette pieces lately, and I didn’t want anything too showy to distract from the gentle play of color in the yarn. The edging would also need to have a gauge similar to the stockinette shawl body. When I looked this time, I found the perfect thing right away. Â I stumbled across this simple edging with columns of yarnovers and decreases, making a beautifully scalloped edge in the first book I opened. I must admit I’m rather smitten. See how it curls around at the very tips?

Because of the flared shaping, the shawl front looks almost ruffled when worn open.

Or it can wrap around to be worn closed. You can see echoes of the sweater in this shot, I think.

(I also love how that upward sweep shows off the shawl pin that Branden bought for me, from Nicholas and Felice.)
The original plan was to continue the increases and make the shawl a few inches longer, so that the ends would wrap up and over the shoulders. I decided to stop here, largely because I wasn’t loving working with this yarn. The shawl is knit in Knit Picks bare lace, which I dyed with Logwood purple  in a workshop I took a couple of years ago. I love the color, but something in the dyeing left the yarn a little rougher than before, and it wasn’t terribly fun to work with. The workshop dyepots weren’t quite ideal, and the dye didn’t fully take to the yarn, so it kept coming off all over my hands while I knit. I think I’ll probably revisit this pattern again in the future with a different yarn to make a longer version; I can see myself wanting a few shawls with this kind of shaping.
The back looks like a simple triangle shawl, with one column of yarnovers decorating the center.

I used a cabled cast off for the hem, which I think gives it a nice decorative edge. There’s an extra yarnover thrown in there to help keep it stretchy.

And so, the spiral shawl is finally done.

After much calculation and reworking to make sure I got all the numbers right in my scribbled notes, the pattern is also ready for test knitting, should any of you want to give it a try. It’s quite a simple knit, with only one row at the body-to-lace transition that requires some attention.
Sun 19 Feb 2012
This has been a busy week, but today I finally managed to sit down and draw up some new sketches for the striped shawl sweater. I’m in need of some mindless knitting, and there will be lots and lots of that once this design is actually on the right tracks (I think this time will be the charm). Since you are all so good at humoring me in my process posts, I thought I’d share the changes that I’m making.
(Incidentally, if you’re hoping for a pattern, you’ll note that the last sketch is really all you need. This whole design is all about putting double increase lines in the right place; after that, it’s just guessing how many stitches to cast on. I do plan to write this up as a pattern eventually, but who knows how long that will take…if a “recipe” is all you need, here it is.)
This is the sketch of the original verison:

You can see that there are two different kinds of increase rows that define the main lines of my pentagon. If you squint, I think you can see them here (look for the yo lines, which are the ones with dots in the drawing above. The point of the shawl back is made up of yos).

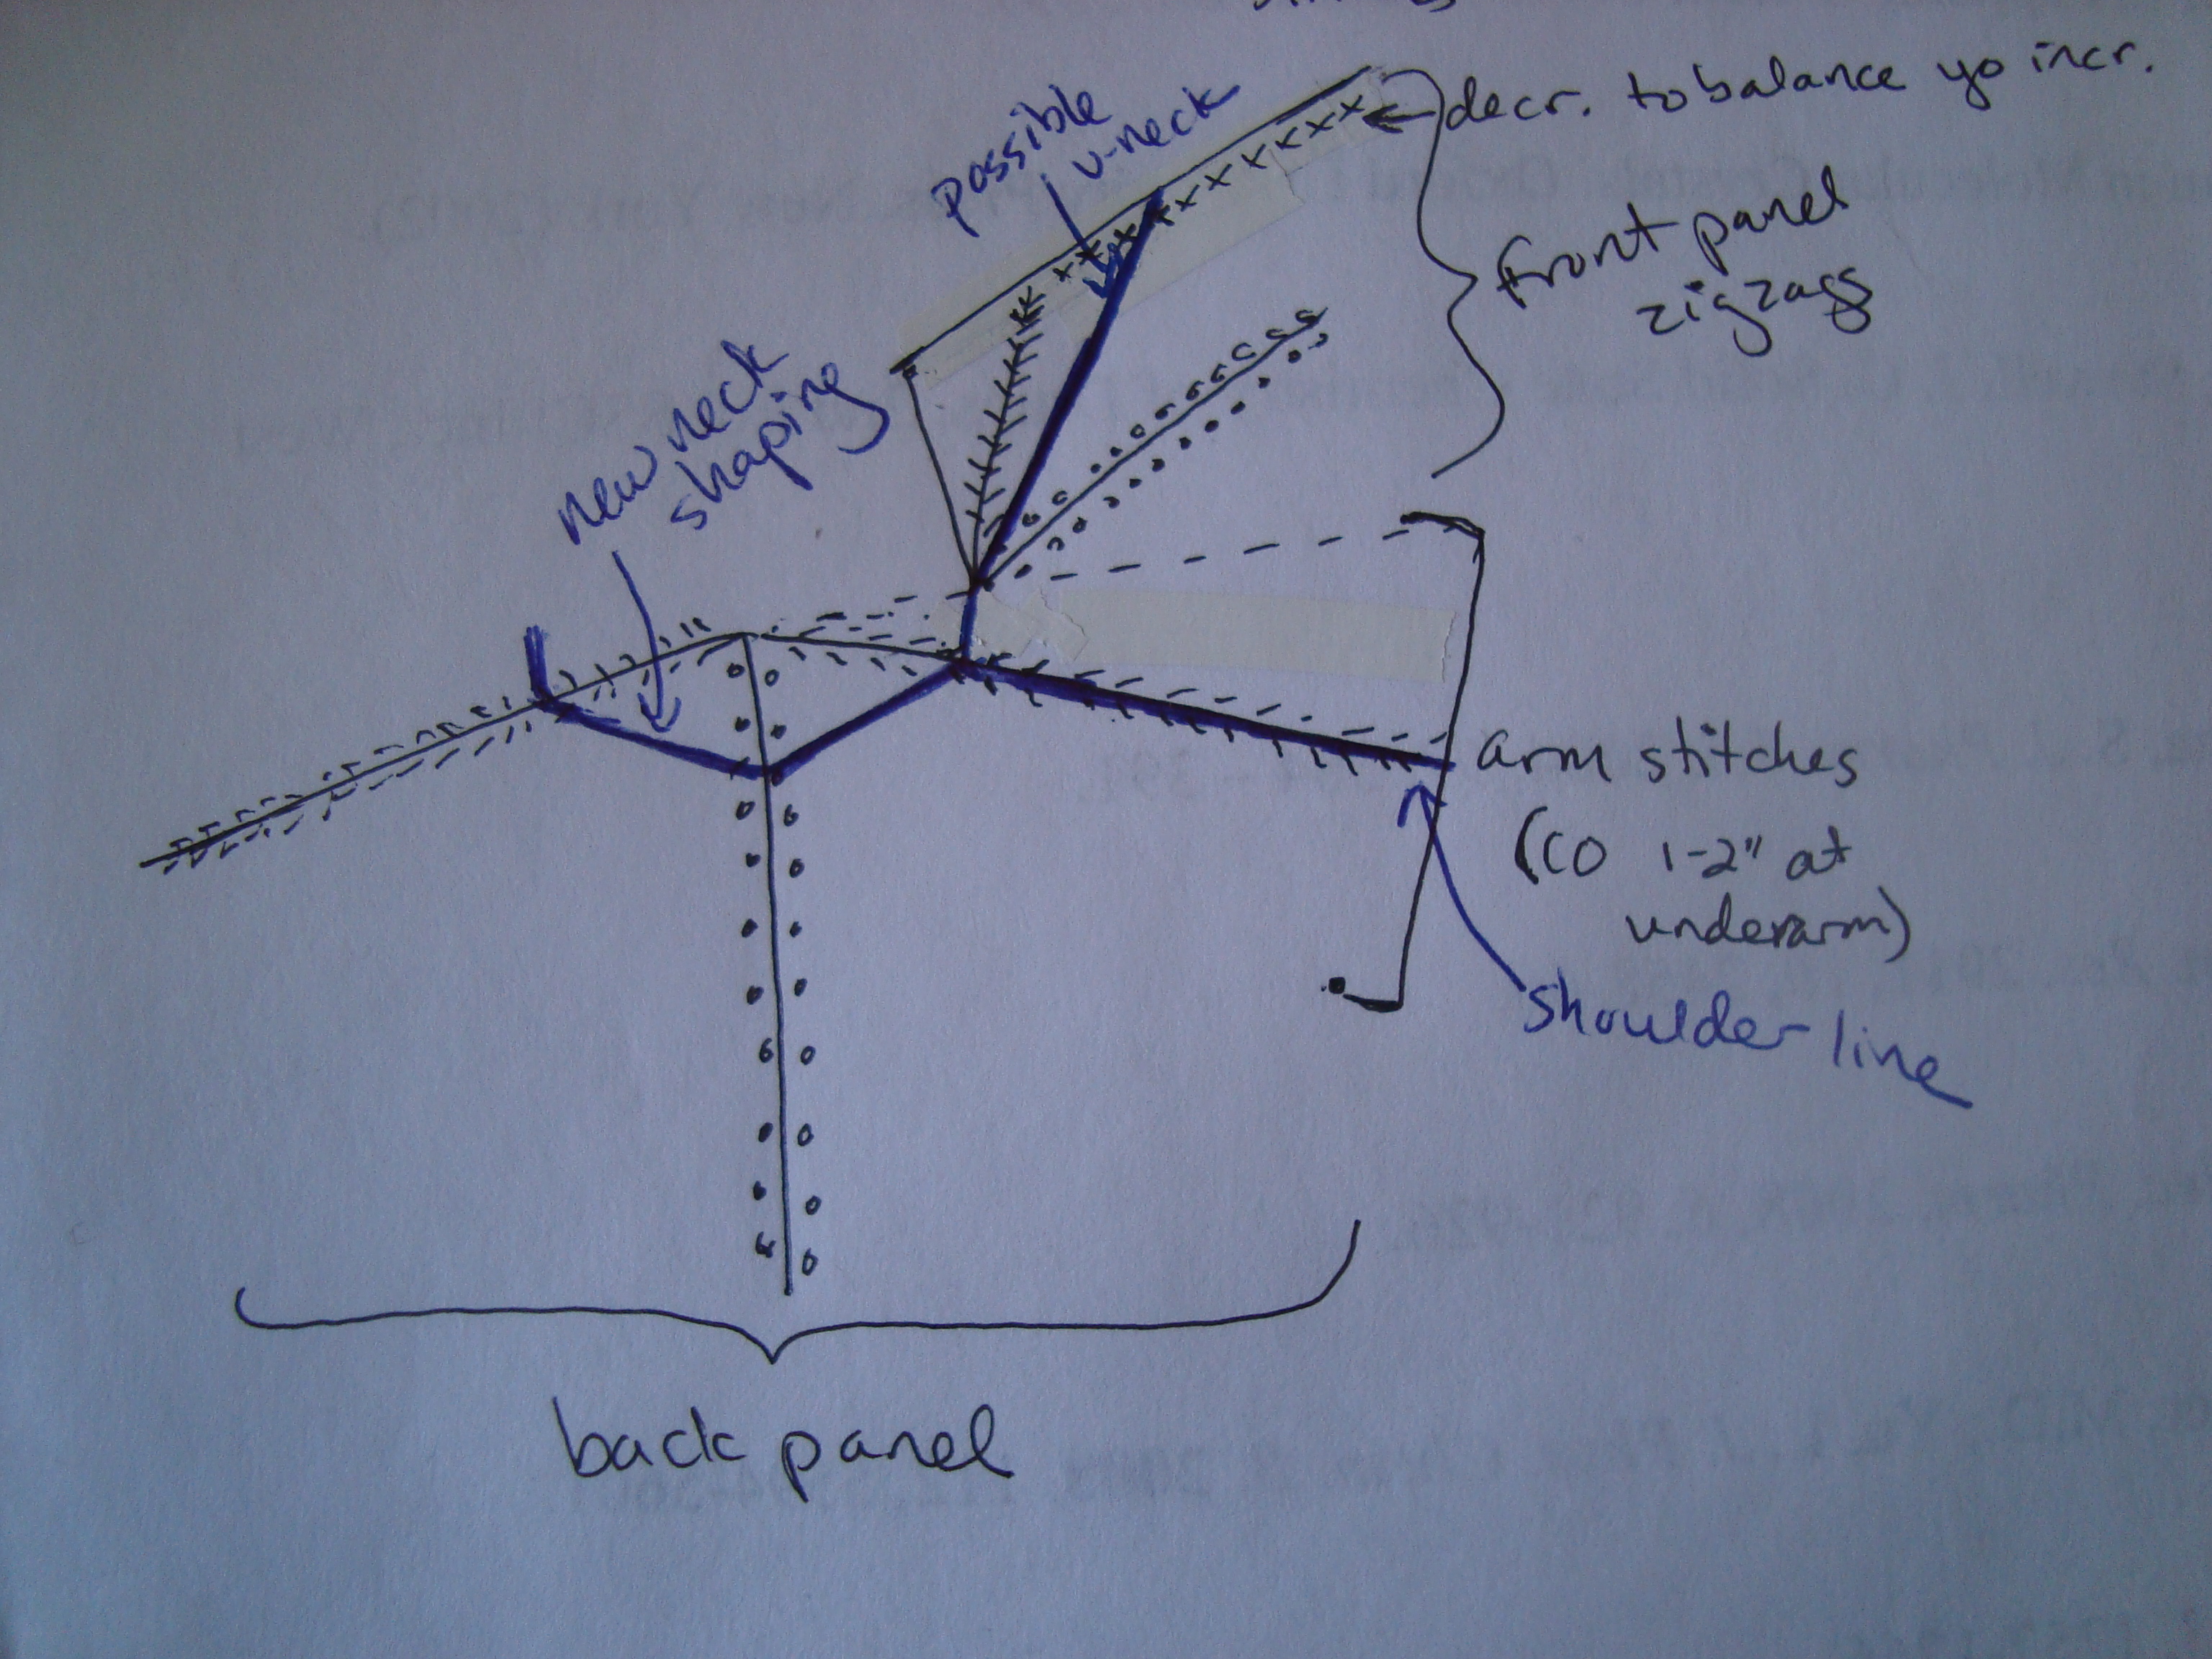
As we saw before, this led to too many stitches in the back panel, and I’ve decided that this is best fixed by changing the position of the shoulder line (shown in red on the photo, and in blue on the drawings):

By rotating that shoulder line onto my double lifted increases (the line with the slashes), I got this:

I’ll keep that increase line as the top of the shoulder and sleeve, which means that there will be more fabric to deal with in the front. It also means that those front yos fall naturally into position for the zigzag style.

…which means that I just have to add decreases at the edge of the front panel to balance the increases that I’m adding from the yo column. (You can see that the fabric is folded over in the photo above to look like two separate front panels.)
This is also the part where I need to decide what to do about the neck. As you can see in the back shot above, rotating that shoulder line makes the back of the neck very high; it’s several inches above where it would normally be.

That’s not necessarily something that I mind, since I’m always cold and usually want something to cover the back of my neck anyway. But I’m thinking that I will probably eliminate the first full stripe repeat, and make my cast on sit at the beginning of that second purple row. That will be a more “normal” fit to the neck, and I think it will help with the fit in the front. You can see that the fabric is sitting a little funny at the front shoulders in the zigzag picture, and I think that cutting out that extra back neck will take care of that.

I’m also planning to eliminate the knit-on garter stitch edging, and instead plan to pick up and knit stitches to finish the collar. That gives me a lot more choice later to decide what I want the final collar to look like.
The last question is whether to keep that small triangle at the neck edge of the front panels. I really like how it wraps the stripes around and brings them vertical again, but I’m not sure how much of that will be preserved with the structural changes in the neck shaping. If I leave out that last set of lifted double increases, then that triangle will be eliminated, and I’ll have a v-neck opening something like this:

That would make a pretty deep v-neck, and the two front panels would probably meet right around the bra strap. Both Branden and Ellen suggested some kind of flap or lapel front, and this seems like the best option if I’m going to incorporate something like that. I’d probably use a solid purple to match the hemline, and just pick up stitches to add it on at the end. It would add another diagonal line to the front panel, and it might also cover up some of the zigzag look near the neck. It would decrease some of the busyness of the design by adding a solid area in the front panel, as Jocelyn (I think?) had suggested earlier.
I’ve been planning this as a zippered cardigan, so I want something that can be either open or closed, but I don’t think that a solid v would take too much away from the zigzags, especially if it came up into a high solid collar.
Making this change would mean that I’d lose those vertical stripes that I like so much, but I think that might actually be better considering how busy this design has become already. With all of those changes, I think the final sweater will look something like this (though the v-neck will probably end up a little deeper, and the shoulders will probably be a little more like a raglan and a little less like a set-in sleeve):

I think I like it.
Fri 10 Feb 2012
Insanity: Doing the same thing over and over again and expecting different results. Â ~Albert Einstein
After realizing that my latest “fix” has still not fixed the striped sweater, I finally sat down today to figure out what is really going on. I’ve been tweaking one thing after another, but clearly there’s something bigger going on that just isn’t working. Whenever I get to this point, it’s time to stop and reevaluate to see what I’m missing. Part of the problem is that I didn’t start this project expecting it to be a sweater, and so I hadn’t gone through all the design thinking that I’d usually do before casting on. So this afternoon, I sat down and looked at it very hard.
And I realized that it’s not a hexagon. It looks like a hexagon, doesn’t it?

But it isn’t. Those angles are not 60 degrees. In fact, they’re much closer to 72 degrees, a fact which quickly explained all the problems I’ve been having.
Instead of splitting my fabric right down the middle, the shoulder line I’m using puts 3/5 of the fabric in the back panel. I had used a different shoulder line in the first picture:

You can see that the first one has the increase line right along the top of the shoulder, but I’d moved it into a more traditional Raglan position in the later versions.

The Raglan line gave me a better fit on the neck, and would have been the perfect solution if I were working with a hexagon, since the stitches would have been evenly divided between front and back.
But I’m not working with a hexagon.
I’m going to have to pull back the latest fix anyway, but tonight I tried it on to check that changing the shoulder line is the right thing to do.
It is. The trouble is, moving the shoulder line puts all those extra stitches in the front, so now I need to figure out what to do with them there.
I’ll definitely have to cut a bunch of them out, but the question is: which ones?
I can take some stitches out of the shoulder area to preserve the pentagon shape and make Raglan shaping in the front. This is very close to what I was expecting with the previous design. The Raglan is a pretty safe option; horizontal stripes aren’t my favorite thing ever, but it’s a classic design and I know I won’t feel too obtrusive wearing it.

Or, I could take the stitches out of the front panel. I like the stripes going up over the shoulders in this one, but I’m not sure I like the front placket. Something in it feels very Pride and Prejudice to me (not that that’s a bad thing, but it’s not quite where I was expecting this design to go). Â Still, I think this one has the potential to grow on me.

The last option is the one that has me most intrigued, but it also has the most potential to go wrong.
This is just another way of taking increases out of the front panel. I think the zig zag effect is interesting, but I’m not sure about adding two more “arrows” to this design in potentially attention-grabbing places. I’d continue the stripes down to mid-waist to match the back, which I think would reduce the arrow effect, but I really don’t know how I feel about this one. My first thought was that I absolutely didn’t like it (clown ruff, anyone?), the second thought was that maybe it wasn’t so bad, and now it’s kind of refusing to step aside.

I like the look of it better when the front is open, and it does do a good job of highlighting the geometry.
Branden is strongly in favor of the zig zags, followed by the front placket, leaving the Raglan in last place. Raglan is low on my list, too, except that I don’t have to worry about whether or not I’ll wear it. The other two are still fighting it out in my mind.
Thoughts?
Tue 22 Nov 2011
There comes a moment in every crazy project where you have to decide whether to dive in or whether to save your sanity and walk away.
I had to stop and consider when I got to this:

which was really only marginally improved by becoming this:

But then, I have visions of this to keep me going:

Sanity is overrated.
Wed 16 Nov 2011
With two sweaters approaching completion, I’ve been busily working away at a new design to take their place on the needles. The fall colors sweater is going to require spinning before it can be knit, so I turned back to the other yarn that has been waiting patiently in line.

I bought this yarn because I loved the vibrancy of the colors, but I knew it was going to take some very careful designing to turn it into something that I would wear. I wanted a pattern that would tone it down with a lot of black, but that would also highlight and flatter the colors.
My first thought was stained glass, but for that I’d need isolated blocks of all the different colors. Since they’re dyed in 6-inch segments, that would either mean a lot of ends or figuring out how to do something useful with stripes.
At first, I came up with this:

It would require an interesting construction, but I planned to knit the jacket from the outside in, so that the stripes at the edge could be knit in a single uninterrupted stripe of stockinette. I worked out the geometry for the front, and even put in some waist shaping, but I just couldn’t make the back work. I knit up 5 or 6 scaled down model versions to try to get the shaping to work out so that the back would lie flat, but it was just not cooperating. I’m all for process knitting, but I don’t think I’m willing to knit a whole sweater in a very odd shape just to decide that the back doesn’t work and rip it all out again. So, much as I like this design, it went to the scrap pile (at least for now…I leave open the option of it making a comeback).
Next, I thought about keeping the semi-angled front opening, but fitting it to a more standard construction.

I like the garment itself, but the stripes become kind of a design detail rather than the focal point of the garment. And I wanted that accent yarn front and center in the design.
Then I thought about other standard constructions that work with stripes. I could do a yoked sweater:

Or a raglan, for sharper edges in the color stripes.

I liked both of these options, but wasn’t sure they were the best we could do, so I kept sketching.
Bolero-type jackets do appeal to me, though I have yet to really wear one. Still, I like to play around with them in the sketching stage, in the hope that I will someday find one that I absolutely must knit.


I like the second one quite a lot, but I’m afraid today is still not the day for a short jacket. (But maybe that design in a different and plainer yarn. Olive green, perhaps, with chocolate stripes. Or a dark gray, with a mauve accent yarn for the stripes and button band.)
Or, I could use a fitted body with set in sleeves, and do non-standard striping.

I love this design. That surprises me, because I don’t think of myself as much of a horizontal stripes person, but I really like the way they’d highlight the shaping, especially if they’re not evenly spaced. If not now, this is a sweater that I would like to knit someday. But it’s high on the list of contenders for today, too.
Or, I could do one of those shadow-knits that are knit sideways and give a garter stitch striping effect.

I like the idea in principle, but I’ve seen a few of those sweaters in person and didn’t love the way they hang as they stretch with use. (I’m also not sure I have enough of the accent yarn.) Perhaps a firm enough fabric would be able to hold its own against gravity, but I’m not sure.
Then came the sketch that I lovingly think of as grandpa’s pajama top:

And I guess that’s all I really need to say about that one.
But there was something interesting hiding in there, too. What if I did a little nip and tuck here and there to add some shaping, and changed the neck a bit?

It’s a simple sweater; just a fitted body with set in sleeves. Couldn’t be easier, really. Worked the right way, the stripes will accent the curves, and should stand out front and center in the design.
But how to make the stripes? It seemed like intarsia would be the best choice. Just a solid stripe, a few stitches wide. I wasn’t sure what that would do with the color repeat, though. So, I swatched.

And I didn’t love it. The repeats are very short (only about an inch), and having several stitches across allows them to mix together more than I wanted. Also, it’s a pain in the neck to make a three-stitch-wide strip lay flat. So, I put it on a black background to hold it in place.

Still not in love, but what if I go down to a single stitch?

Now that’s more like it. The color segments are now a couple of inches long, and there’s a much more gradual transition from one to the other. Stretching the repeat out like this highlights all the beautiful colors in the yarn, but without letting it devolve into a chaos of colors.
Then, I thought about the painted warp weaving that I’ve seen. Here’s an example from Daryl Lancaster’s collection, which I saw in person in my class at Rhinebeck:

The effect is achieved by dyeing two separate warps (the threads that go lengthwise along the fabric), and then shifting them relative to one another so that the color repeats are offset.
I found the full color repeat of the yarn (about 3 yards), and laid out 6 strands next to one another. Then I lined them up so that I liked the colors that ended up next to one another. I marked the strands, and began knitting them into a black background.

You can see here that I had two different sets of color repeats, in groups of three. In each group, the two outer stripes change together, and the inner one is on a different repeat. After seeing this swatched up, I think I’d prefer it if all the stripes change at the same time for this yarn. But I can imagine lots of things that you could do with this general idea, especially in more subtly-shifting colors with a foreground and a background that can be offset.
I also played with the spacing of the stripes. I started out with three stitches between them, then reduced to two, then to one. I had intended to do my shaping in the wider black areas between the stripes, but I actually like the way this looks, so I may do some shaping in between, too. If I do keep the stripe spacing constant, I like the single-stitch spacing the best.
I love the way the reverse side looks, too. So nice and neat. All the intarsia wraps line up, and create “vertical purl stitches” as Branden put it.

I think this may be it.
I’ve said before that I’m not very good at the artistic arrangement of stripes, so I’ve been doing due diligence on Google image search trying to find a pattern that will work here. I’m not stuck on groups of three, and actually I’m thinking that a more random arrangement will probably work better. I’ll also need to decide where to put the color repeats in the garment (neon pink on the bust shaping, or at the waist? Don’t want that to end up in the wrong place by mistake…), but I think this could work well.
And if not, I suppose I can always fall back to the fitted sweater with the horizontal stripes. I really like that one as well. So many options. And none of them take all that much of the accent yarn, so I suppose I could always make more than one…
(This is how I end up with more designs than I will ever knit. Every project creates 6 more sketches I really want to try.)
Sat 12 Nov 2011
When I first envisioned the fall colors sweater, I thought it would be something lacy. Probably a cardigan, with vertical lace panels separated by some spacers. Something like this, perhaps:

But then the issue of grist meant that I ended up with 30% less yarn than I’d expected from that fiber. Fortunately, I am working on the Falkland lace sweater at the same time, with the same yardage. So I have a pretty good idea of how far 928 yards will stretch.
The answer is that it will stretch enough, but only if I want a lightweight sweater with very open lace. I happen to love the way the Falkland sweater is coming out, but it’s probably not a weight that I’ll use for more than a few months a year, and definitely not in the fall. Also, I think that a lace that open really needs a semi-solid yarn to keep the color from fighting with the lace pattern. This yarn might work in a more solid lace, but I think it would be too much variegation for a really open pattern.
So that sent me back to the drawing board. Somewhere in our emails back and forth, Jan suggested that maybe a Chanel-inspired jacket would be the thing. This had me enchanted for quite a while, trying to figure out how I might stretch the yarn to make it work. It would have to be a short jacket because of the yarn restrictions, but I could use a different color as trim to help stretch it out a bit.

Unfortunately, I’d want this to be a really solid, stable fabric, probably with an almost woven texture. And that spells heavy yardage requirements. I thought about using two colors at once and dyeing something to match, but I still don’t think that will stretch the yardage enough.
I also thought about actually weaving it. You get a lot more fabric for the yardage with weaving than you do with knitting, so I could make this go farther on the loom. I’d also be using a different yarn for the warp, so I’d automatically get twice as far. I did some calculations, and really looked carefully at what it would take to cut these pieces from the widest fabric I can make on my loom, and I think it would still be cutting it a little too close. If I wanted a really cropped jacket or short sleeves I could probably make it work, but I think I’m unlikely to have occasion to wear either of those styles very often.
So. Definitely keeping this jacket idea in the active list, but probably not in this yarn. I think it would look great knit up, though.
Then I thought about working a more fitted jacket and having the sleeves in a contrasting color. The extra fitting takes out a significant portion of the yardage, and the contrasting sleeves cut out a lot more. If the body were worked in two colors, I might have enough to make it on this design. Based on the gauge of the Falkland sweater, I still don’t think I could get the full vest out of the fall colors yarn in stockinette. But colorwork might just do it here.

Next, I started thinking raglans. These are nice and simple, because you just start at the top and knit until you run out of yarn. They’re also very safe projects for me, because I’ve done enough of them to know that it will turn into something I’m likely to wear. (Though, incidentally, I have yet to actually knit myself a raglan.) I was thinking of something like this, minus the gorilla shoulders:

Olive green semisolid at the neck would put a spacer between the orange and my skin tone (one of the reasons that I don’t wear orange much is that I have a good bit of yellow in my skin and sometimes yellow/orange can make me look jaundiced). Then I’d do a dark brown for the main body, tying in both the greens and browns of fall. This could work, and it was actually my #1 choice until I sat down and started drawing these out. Seeing it on the page, though, it’s not quite as appealing as some of the other options. It’s still high on the list, but I’m not sure it’s right for this yarn.
I could also do some kind of colorwork or striping to spread the orange highlight yarn out over the entire sweater.

If done well, I think this could be absolutely stunning. Unfortunately, artistic arrangement of stripes is not my greatest strength. I am usually a little too mathematical and geometrical to come up with the kinds of dynamic striping that I’d want here. The sketch makes it look rather unappealing, doesn’t it?
I could do a raglan design with the fall colors yarn as an accent band, but I want it to stand front and center in the design, and I’d like to use up the yarn that I have. (Yes, I know. I am picky, picky, picky in the design phase. That’s why I usually end up with things that I like in the end.)
My current favorite leans back toward the more tailored jacket look, and is loosely based on a commercial sweater that I wear all the time.

This would be a zip-front cardigan that’s fitted but still has a good bit of ease. It’s a more casual cut, so I’m more likely to wear it often. The seam between the side panels and the front fabric would give it a nice silhouette look, especially if there’s a strong contrast between bright body and dark panel colors. The sleeves could be a contrast color, and the underarms would be a solid or semi-solid to match the sleeves. That would take out a good 8″ of fabric from the body alone, helping the yarn to stretch further. The rest of the body could then be colorwork or a two-color textured pattern to stretch the yardage again (which should make up for the extra density of the fabric). I’d probably do an olivey-green for the sleeves and underarm panels, and a deep, dark brown for the other body yarn.
This could be done with any number of colorwork or texture designs. The dark brown should help the orange to “pop”, like the dark branches highlighting the fall foliage. Adding in the green and brown also pulls this closer into my usual color palette and might make it more likely that I’ll wear it often.
I’m a little torn about that last part. Practically speaking, I do think that I’m more likely to wear greens and browns than just orange. I was kind of in love with the pure orange-reds, though. The strong, bold colors are the whole point of this project, after all. I don’t want to dilute them down. I also don’t want this to be something that has to be worn as an earth-tone; I like the idea of making it a real focus piece. I think that I should be able to come up with a colorwork design that uses the darker colors to highlight the oranges, though. If I’m good, I should be able to use the design to narrow the focus even further, from the garment level right down to the individual yarns.
I don’t know if I’m that good, but I think I want to try.
The other slightly scary thing about this design is the construction. I haven’t done much designing for seamed sweaters, so this one will be a bit of a stretch. Add to that the fact that there will be 5 body panels, and that’s a lot of planning. I’m thinking of doing it with steeks, which will let me do the colorwork in the round and then seam at the end, but that means no trying on and checking of design along the way. It will also be a very oddly shaped garment until the steeks are cut.
I think that’s manageable, though. Those lines aren’t really very complicated, and I really like the semi-tailored look that the side panels give to the design. It’s not a closely fitted garment, so there should be some room to adjust at the end, if necessary. It would also give me a reason to steek a full sweater, which very much appeals to the seamstressy side of me. The colorwork and contrasting sleeves will guarantee that I have enough of the focus yarn, and I can dye and spin up as much as I need of the other colors.
So, I think this is it. Still dithering, poking around and exploring other ideas. I’d still need to sit down and figure out how much more yarn I need to spin, and to decide on the perfect colors to match. Solid? Semi-solid? Something else?
So many decisions still to make, but I think we’re getting closer.


